
RE:Vision Effects products with Cinema4D
Assigning a Coverage Alpha Matte to the Control Source
Some of our products alkork from image data rendered from a 3D renderer. Here are notes about Motion Vectors but they apply as well to exporting surface normals or UV maps…
Since the Motion Vector Pass does not include an alpha coverage matte, the idea is you will need to use either the C4D Object Buffer alpha or simply the color (RGBA) alpha as Coverage Alpha Matte. In After Effects this would amount to something like this.
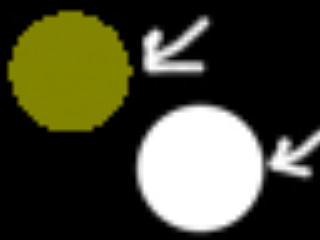 Here for demonstration purposes we just moved then added the Object Buffer over the MV pass to compare the results and scaled 5 times to see better. Note where the arrow is how in one case there is a “pixel” coming out and in the other case not. The problem is over and under that example value, the object buffer returns 100% alpha, thus telling us that this is a valid value, yet in the corresponding MV pass pixel value we get a value of zero, which if the Object Buffer says 100% will now mean for us Max Motion towards the lower left corner.
As a result of this you probably as well need to shrink (choke) that matte by something like 1.5 pixels to avoid artifacts. Another alternative as the MV are rendered over black is to simply make a key so the black values become 0 alpha.
For example:
Here for demonstration purposes we just moved then added the Object Buffer over the MV pass to compare the results and scaled 5 times to see better. Note where the arrow is how in one case there is a “pixel” coming out and in the other case not. The problem is over and under that example value, the object buffer returns 100% alpha, thus telling us that this is a valid value, yet in the corresponding MV pass pixel value we get a value of zero, which if the Object Buffer says 100% will now mean for us Max Motion towards the lower left corner.
As a result of this you probably as well need to shrink (choke) that matte by something like 1.5 pixels to avoid artifacts. Another alternative as the MV are rendered over black is to simply make a key so the black values become 0 alpha.
For example:
COMP 1: Apply Motion Blur

[x] Layer 1: Source Color

-> effect: RSMB with Vectors

Set MV source: Layer 2

[ ] Layer 2: COMP 2 Motion Vectors
(and in COMP 2 you set the alpha channel appropriately as explained below) Object Coverage Workaround: There appears to be a slight mismatch between the render passes in C4D and the color “beauty” passes.
Here for demonstration purposes we just moved then added the Object Buffer over the MV pass to compare the results and scaled 5 times to see better. Note where the arrow is how in one case there is a “pixel” coming out and in the other case not. The problem is over and under that example value, the object buffer returns 100% alpha, thus telling us that this is a valid value, yet in the corresponding MV pass pixel value we get a value of zero, which if the Object Buffer says 100% will now mean for us Max Motion towards the lower left corner.
As a result of this you probably as well need to shrink (choke) that matte by something like 1.5 pixels to avoid artifacts. Another alternative as the MV are rendered over black is to simply make a key so the black values become 0 alpha.
For example:
COMP 2: Fix Motion Vectors

[x] Layer 1: Motion Vector Source

-> effect: Simple Alpha Choker (value 1.5)
Exporting UV Maps from Cinema 4D for use in RE:Map Important Note: It is expected that before you look at the examples on this page that you have read the short manual that is put on your disk with the plugins by the RE:Map installer.
- Click here to download the RE:Map walkthrough examples. Look for the explanation files (in HTML format) after you download the files to your disk. The package is 19 Mb. The tutorials have been updated to include a short description of how to use RE:Map Inverse UV, a plugin that was added for RE:Map version 1.1.
- Click here for a short movie that shows how to export UV maps out of Cinema 4D. This short movie is kindly provided by Dr.-Ing.V.Sassmannhausen